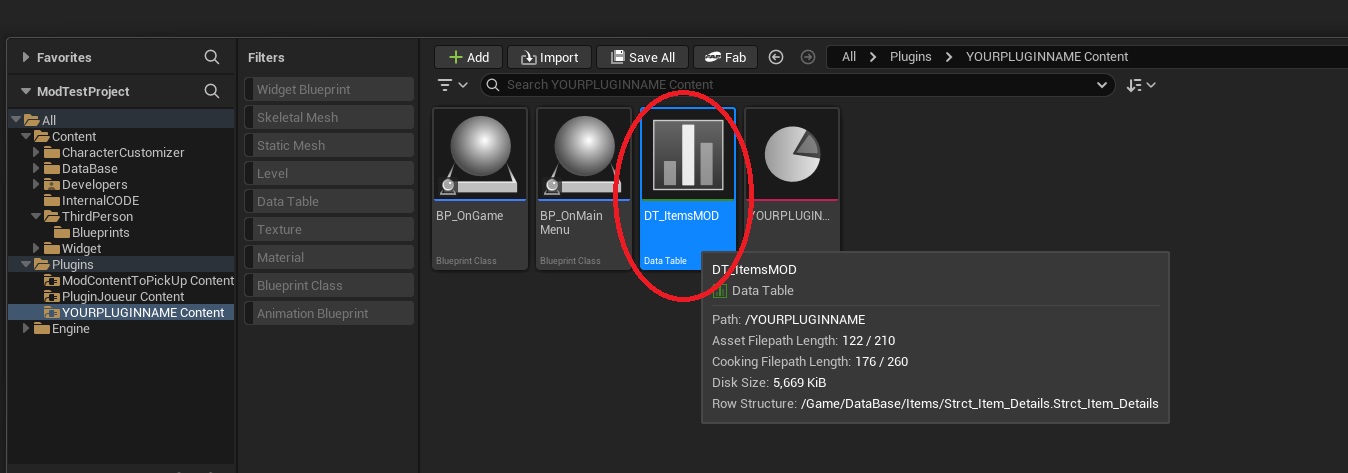
In this tutorial, we're going to create a new item in the mod; no special programming knowledge is required. First, we'll open the item data table:
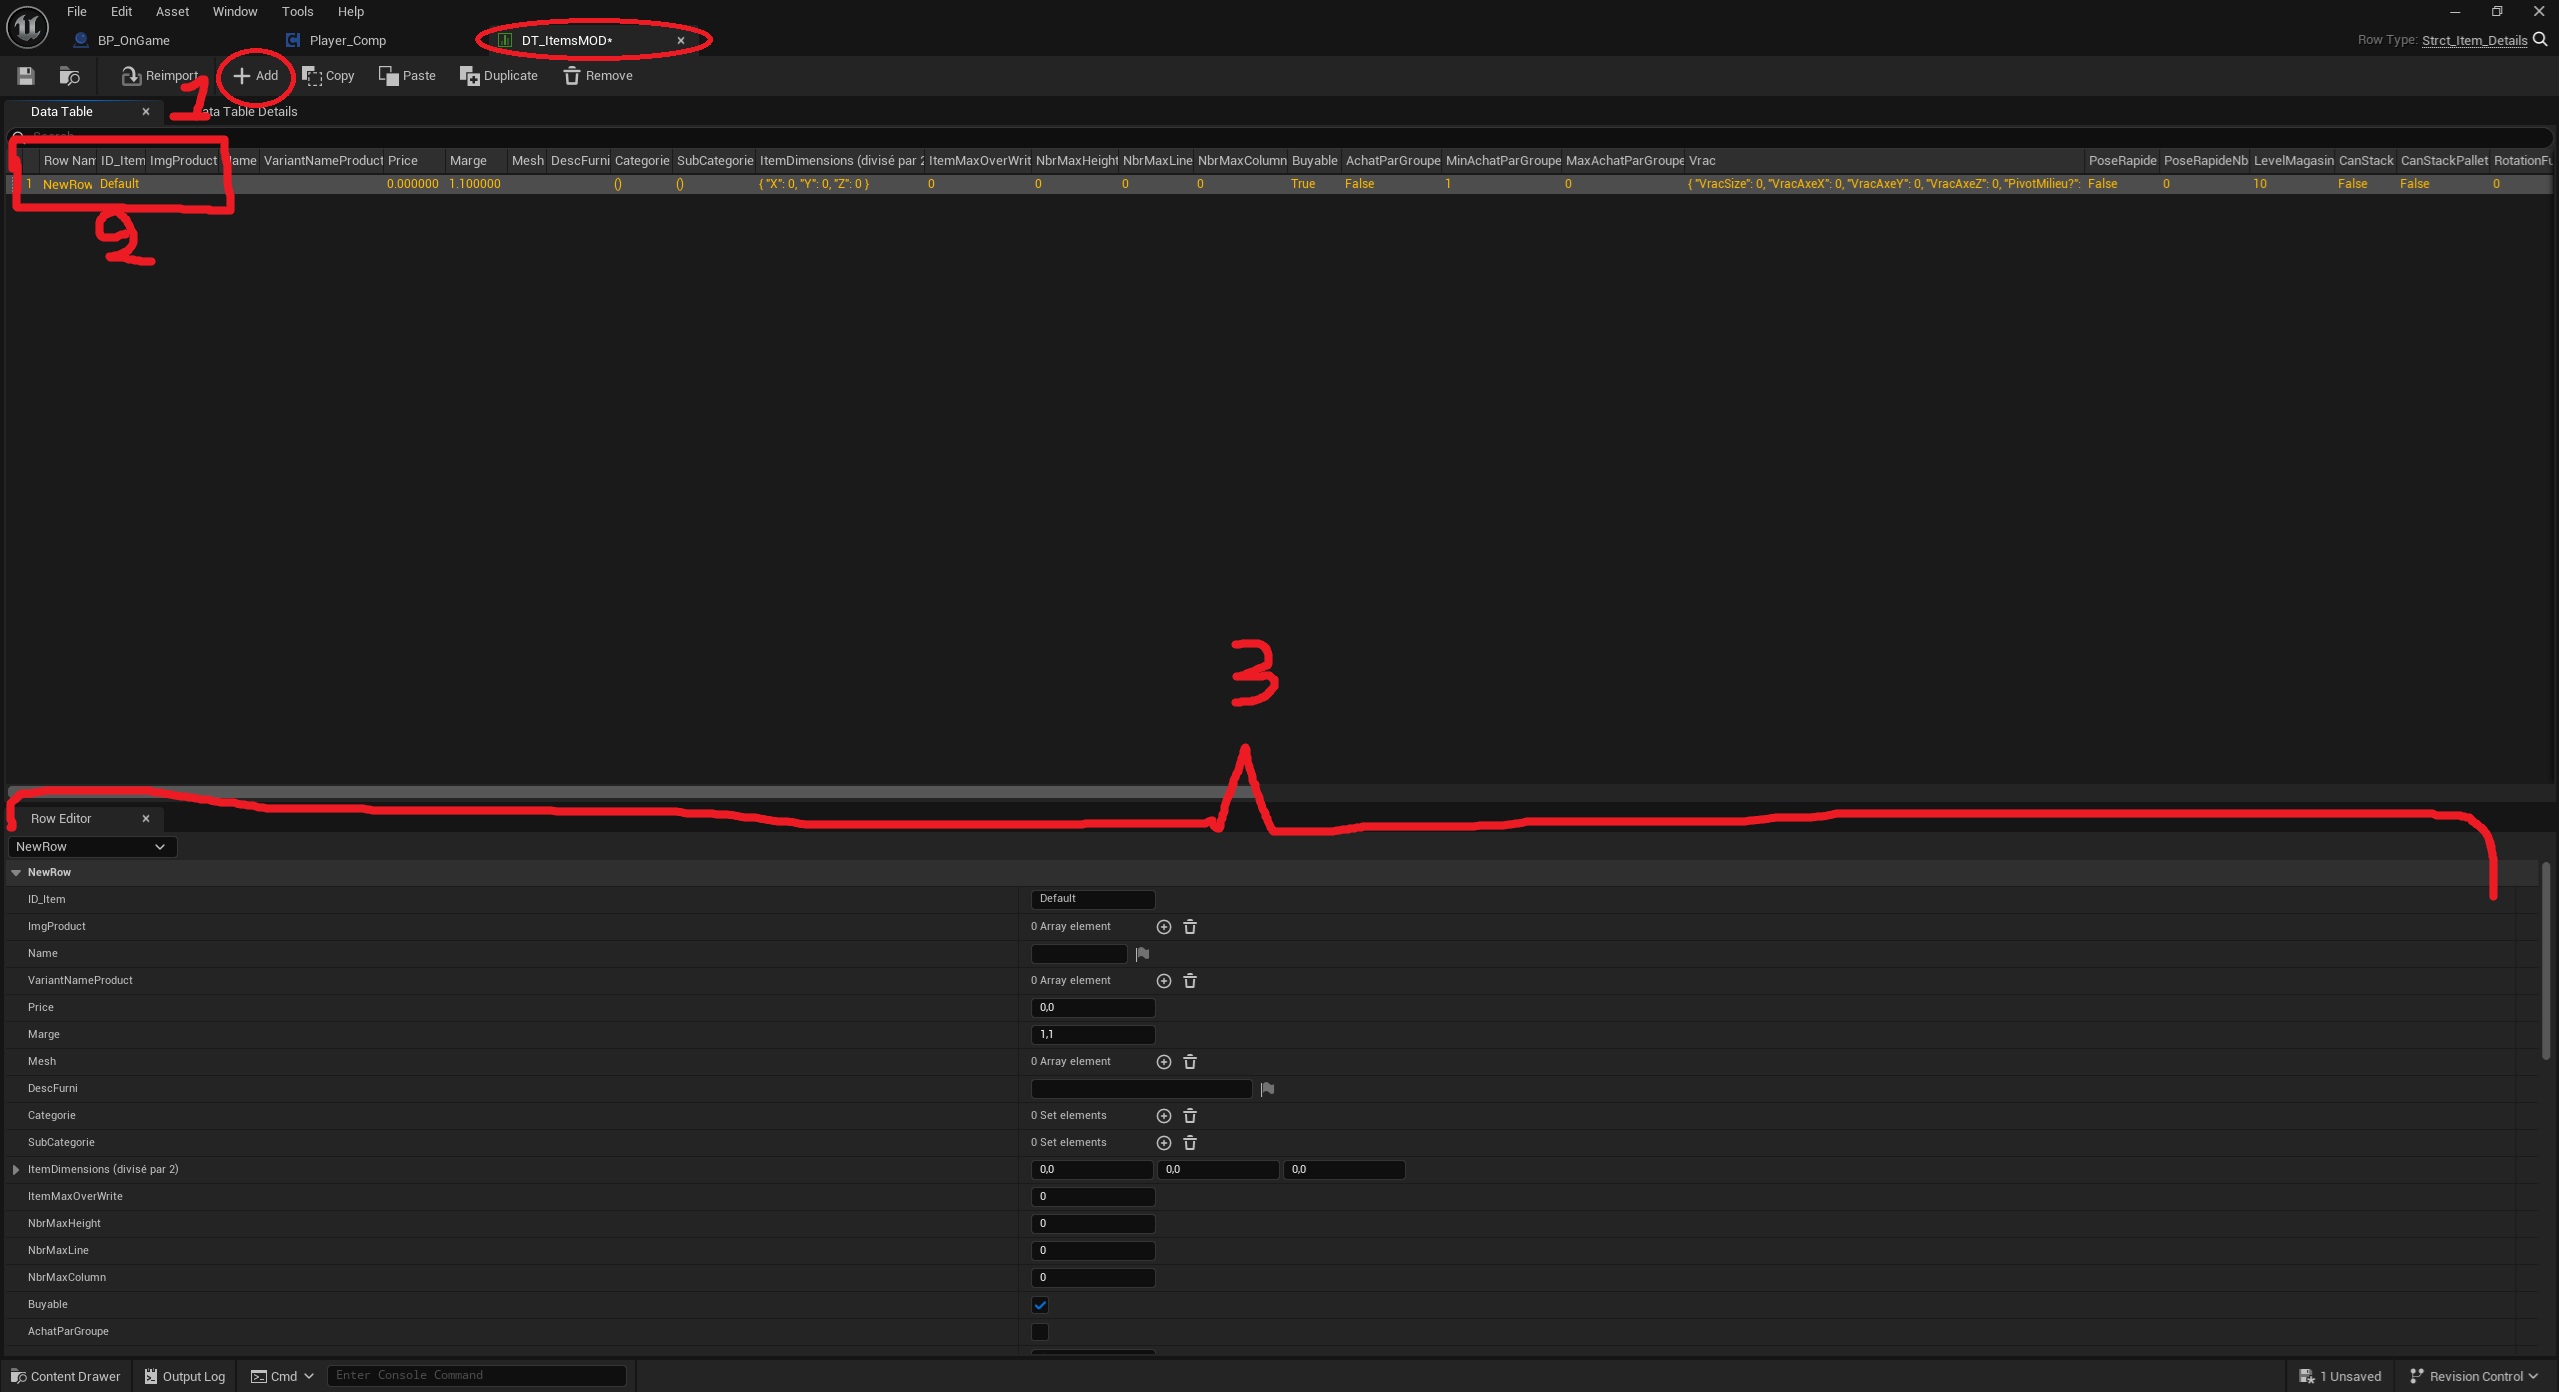
Here is the data table interface. First, we'll create a row by clicking “Add” in the upper-left corner of the screen, then select the row that was just created, and finally change the settings at the bottom.
(Note that if some tabs are missing from your menu, you can display them by clicking “Windows” in the upper-left corner and then selecting the missing windows.)
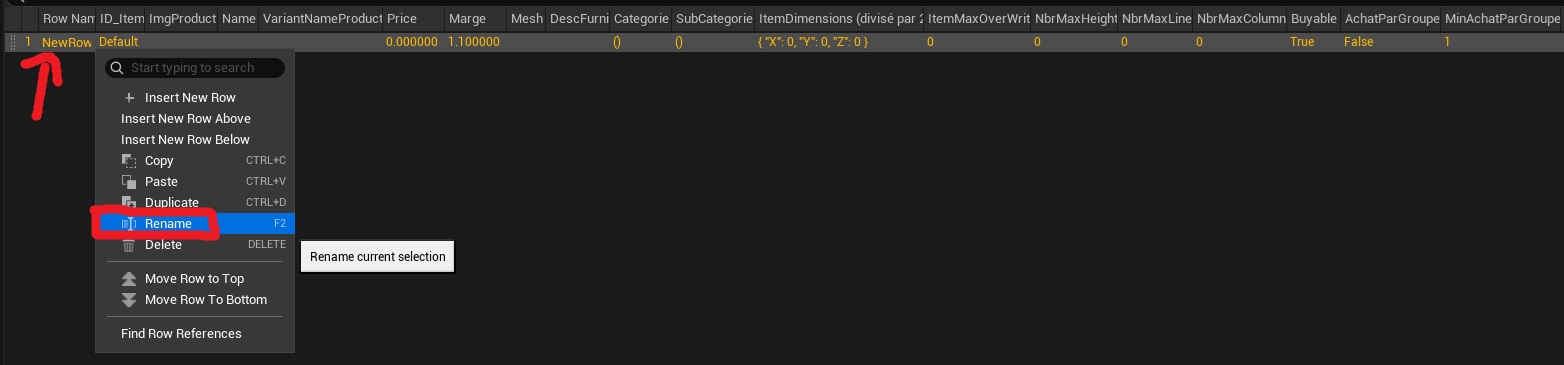
So first, you need to create a unique identifier for each item; each row of data corresponds to one item (including color variants, with up to 4 items per row).
(This ID should be as short as possible and must not contain spaces, special characters, or accents.)
You can assign an ID to a line by right-clicking on it and selecting “Rename.”
Next, you can move on to the bottom section with all the variables to set. Here's what the tab looks like in the image:
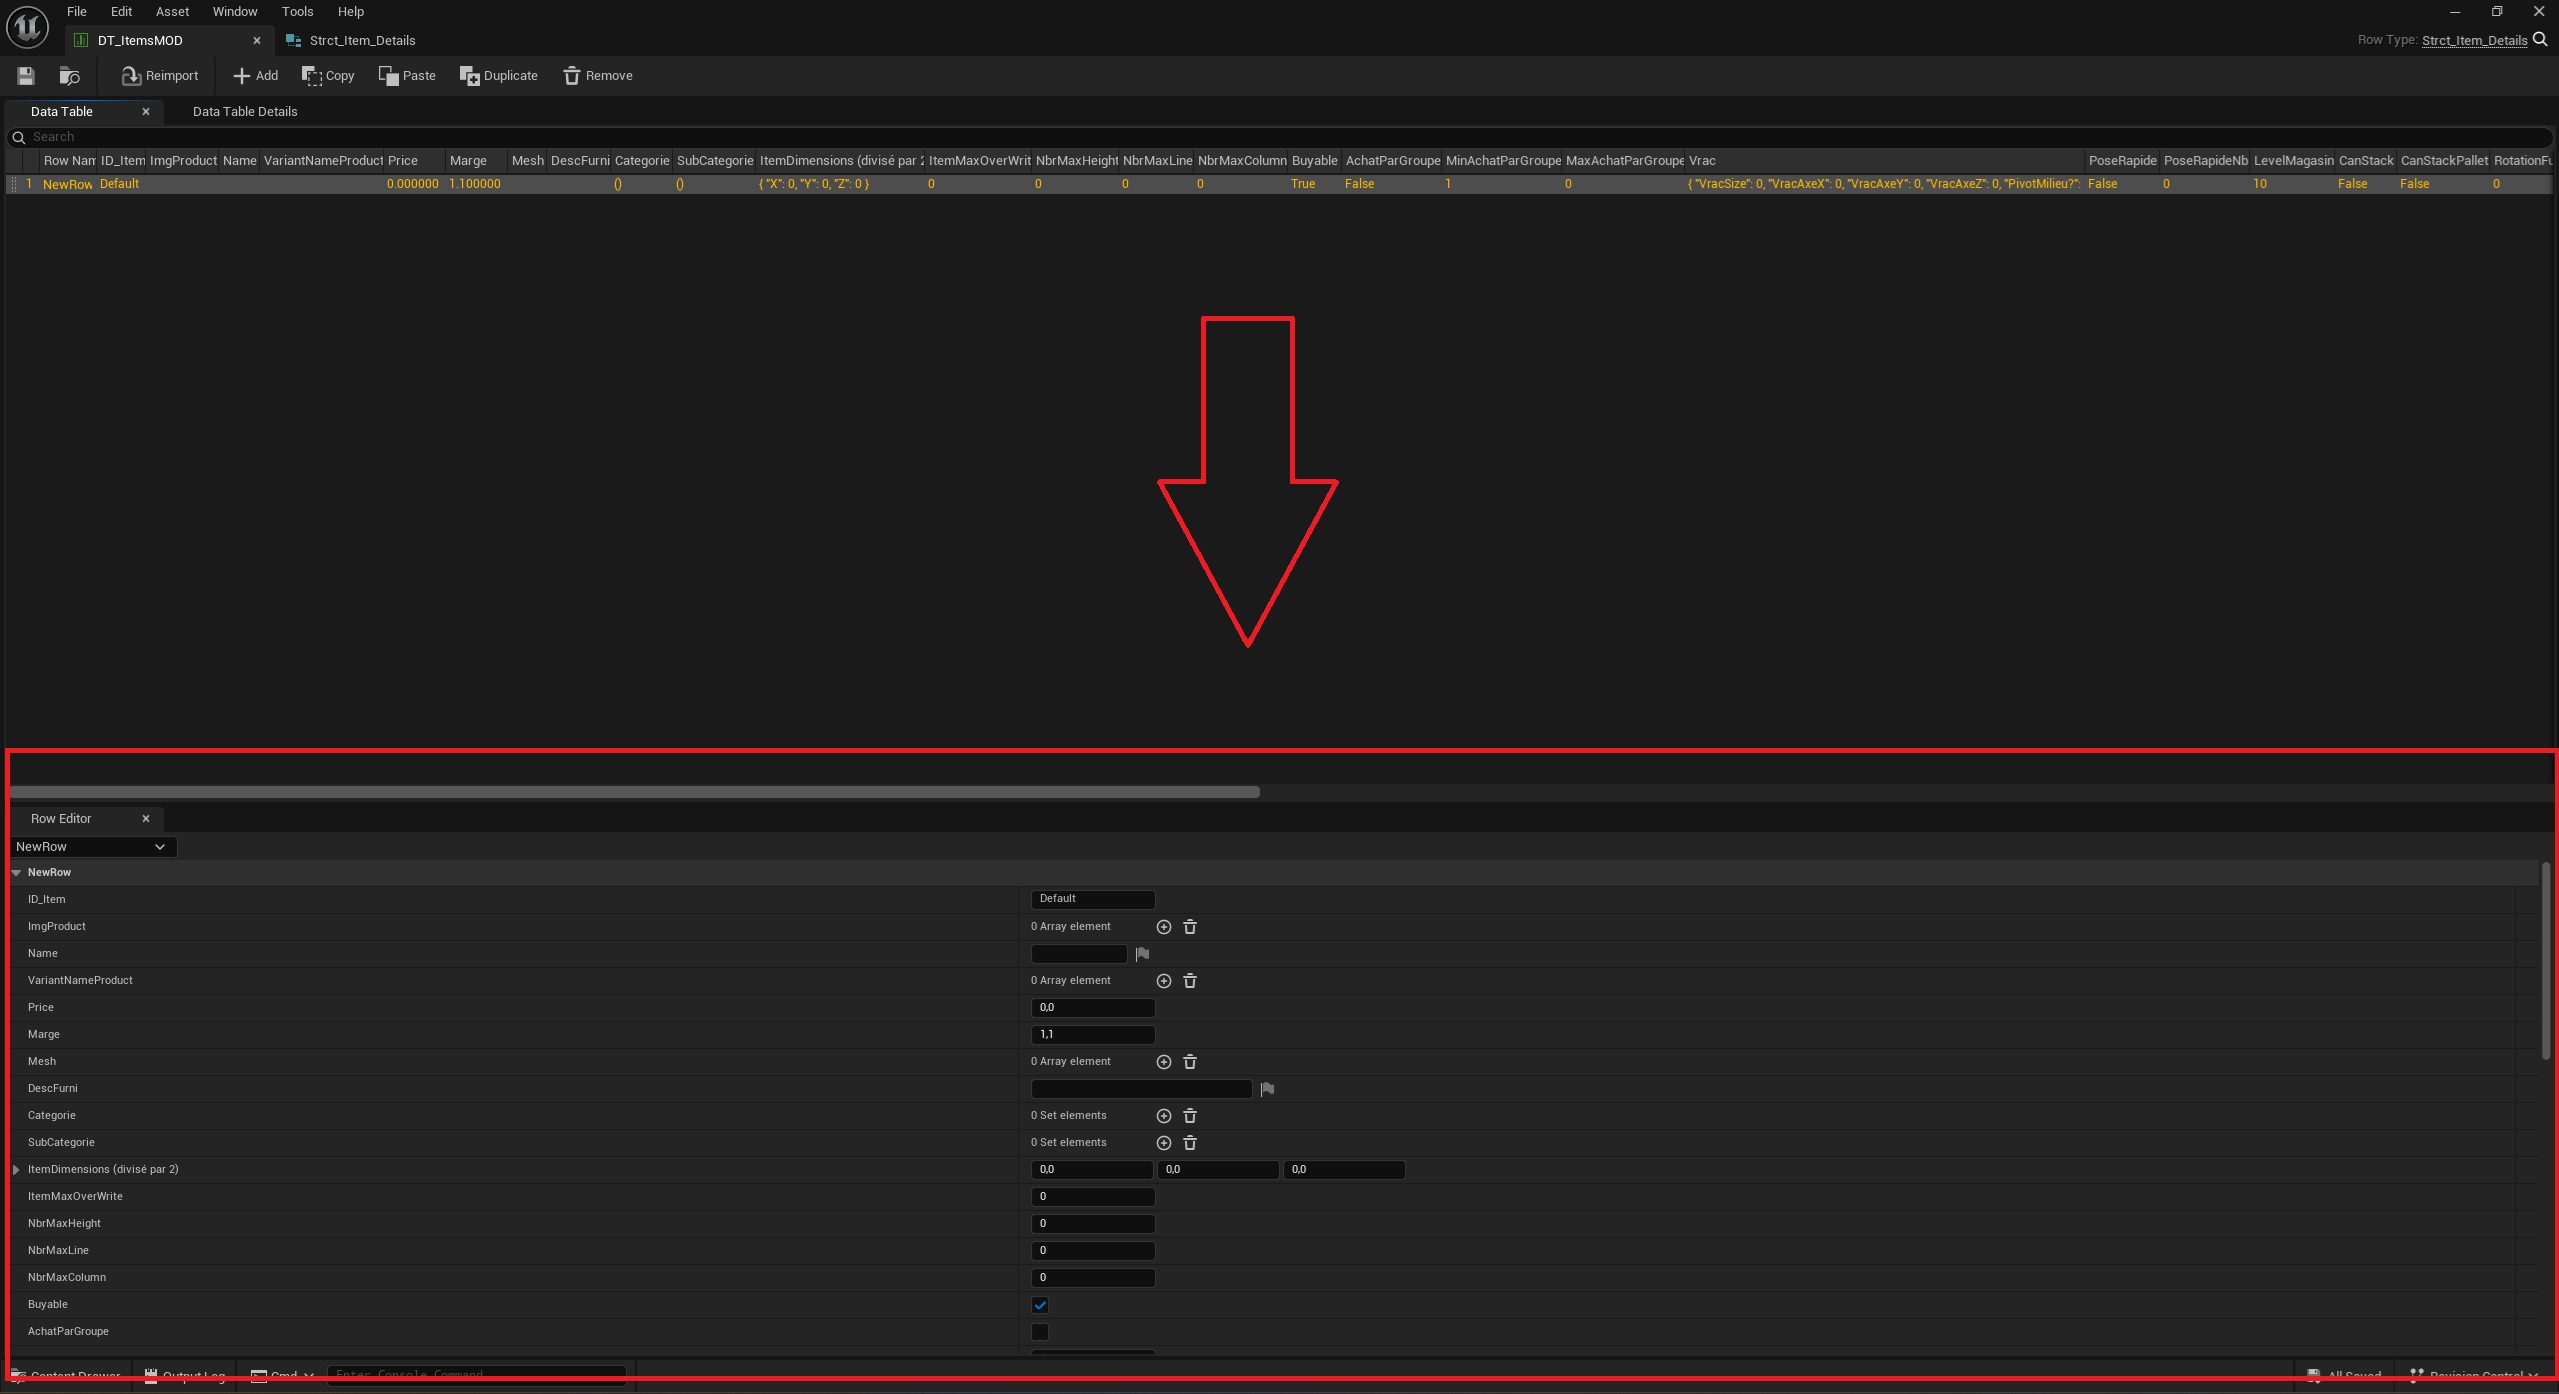
Here is a list of all the variables, along with their types and how to initialize them correctly:
Name - Here, you must enter the line ID (exactly as you entered it in the previous steps).
Array of Texture2D - Here, you should upload the product image that will appear in the menus. (If your product has multiple variants, please upload the images for each variant in sequence.) To add an image, click the circled “+” button.
If you want to use our tool that converts 3D models into images, please click on the documentation category titled “Convert 3D Models to Images.”
Text - Here you can enter the name that will be displayed for the item in the game.
(If you create an item with multiple variants, and the variants have different names, please leave this field blank.)
Array of Text - Leave this field blank if you have filled in the “Name” field
Here you can enter the names of your product variants. Please make sure the order of the products matches that of the “ImgProduct” variable.
Float - Do this only after initializing the variables "CartonVector"
Here you can enter the purchase price per carton of the item (not the unit price of the item)
Float - This is the profit multiplier for reselling an item before a customer complains (the maximum profit before the price turns orange in the inventory menu)
(e.g., setting the number to 0 means the item will be resold at the same price it was purchased for; setting the number to 1 means the item can be resold for up to twice the purchase price)
Array of Static Mesh- Here you can enter the 3D model for the item you want to add (if you're adding variants, please use the same order as the “VariantNameProduct” variable)
If you want more information on how to import a static mesh, click on the “Import Files into Unreal Engine” category in the documentation.
Text- This field is optional and is recommended only for items that require a description. Here you can enter a description that players will see when they hover over the item in the menus.
Array of Name - Allows you to select the category in which the item will be displayed on the in-game store page. Please note that selecting the wrong category will prevent the item from being displayed in the store.
(To find out which category to assign to items, please click on the documentation category “Create and Set Up Categories”.)
Array of Name - Allows you to select the subcategory in which the item will be displayed on the in-game store page. Please note that selecting the wrong subcategory will prevent the item from being displayed in the store. The subcategory must be linked to the same category in the category data as the item’s category and subcategory.
(To find out which subcategory to assign to items, please click on the documentation category “Create and Set Up Categories.")
Vector - Here, you must enter the half dimensions in centimeters of the 3D model you imported.
(If you don't know the dimensions of your 3D model, you can click on the “Find the Dimensions of a 3D Model” section in the documentation.)
Integer - Must remain at 0 if the item is placed on non-special shelves (the only special shelves in the game are clothing racks and barrels, which have rounded item placements)
If the conditions for the shelf are met, you can enter the number of items that can be placed on that special shelf. The other shelves (standard shelves) calculate the quantity automatically.
Integer - This variable is optional. Here you can limit the number of items that can be stacked vertically on a shelf. (Useful for small cans and to prevent 10 items from being stacked on top of each other just because there is space.)
For items that should not be stacked, please set this parameter to 1.
Integer - This variable is depreciate.
Integer - This variable is depreciate.
Bollean - Here you can check the box to allow customers to purchase the item. (This applies to absolutely all items, but you should uncheck it for all decorations and furniture.)
Bollean - Here, you can uncheck the option if you want customers to keep the default quantity of items to purchase for this product, or check it to use the quantities you define in the two variables below. (This is useful for fruits and vegetables, for example, so that customers don't buy only 1–4 items per purchase of strawberries or other items.)
Integer - You should only change this option if you have checked the “PurchaseByGroup” variable. Here you can specify the minimum number of items a customer must purchase when selecting this item.
Integer - You should only change this option if you have checked the “PurchaseByGroup” variable. Here you can specify the maximum number of items a customer must purchase when selecting this item.
VracSize - byte - If = 0 all items are the same size; if = 1 the items vary in size between 0.95 and 1.05; if = 2 the items vary in size between 0.9 and 1.1.
VracAxeX - byte - If = 0 the items do not have a random rotation around the X-axis; if = 1 the items have a random rotation between -180° and 180° around the X-axis
VracAxeY- byte - If = 0 the items do not have a random rotation around the Y-axis; if = 1 the items have a random rotation between -180° and 180° around the Y-axis
VracAxeZ- byte - If = 0 the items do not have a random rotation around the Z-axis; if = 1 the items have a random rotation between -180° and 180° around the Z-axis
PivotMilieu - Bolean - Check this box only if the object has its pivot in the center; uncheck it if the pivot is not in the center. (If you don't understand this or don't know how to change the pivot of a 3D model, you can click on the documentation category “How to change the pivot of a 3D model”)
ItemPosPlacement- byte - If = 0, the items will be pushed to the very back of the shelf (used only for fruits and vegetables that have shelves designated for this purpose); set to 1 for all other types of items
Quinconce- Bolean- If checked, the items will be placed in the box in a staggered pattern, that is, alternating between the left and right sides.
CorrectionQuinconce- Float- This option is only useful if the “Quinconce” checkbox is selected. It is used to adjust the spacing caused by the staggered arrangement of items in the box; this is useful for tightening or loosening the spacing between items in the boxes if the stagger option is enabled.
Bolean - Checking this option ensures that when the player places items, they are placed more quickly rather than one by one.
Integer - This option is only used when the “PoseRapide” checkbox is selected. It allows you to place items x times faster (x = the number you enter).
Integer - This is the level at which the item will be available in the Gems menu
Bolean - This variable is depreciate.
Bolean - This variable is depreciate.
Array of Name - This option is for items only - Select the type of support on which the item can be placed; a shelf always contains a single support.
(To find out which support to use here, please click on the guide “Create and Set up a Furniture Support”.)
Array of Array of Name - This option is for furniture only; it allows you to select which support a piece of furniture uses. Each list contains a list of supports, and the main list contains the lists of supports organized by furniture type (in case there are variations of the furniture).
Float - Rotation around the X-axis for each individual item on furniture only (does not apply rotation to items in boxes or on pallets.)
Float - Rotation around the Y-axis for each individual item on furniture only (does not apply rotation to items in boxes or on pallets.)
Float - Rotation around the Z-axis for each individual item on furniture only (does not apply rotation to items in boxes or on pallets.)
The settings for the 3D image variable are optional and are only useful if you are using our tool for creating images from 3D models.
(For more information, see the documentation category “Convert 3D Models to Images.”)
Vector - Do this only after initializing the variables on the item's box. (For more information, see the “Add or Set Up a Box data” section in the documentation.)
Here you can specify the number of items in a box, where:
Name - Do this only after initializing the variables on the item's box. (For more information, see the “Add or Set Up a Box data” section in the documentation.)
Here you can specify the type of box the item will be packed in. This must be the ID of the “Box” data line.
Bolean- Do this only after initializing the variables on the item's box. (For more information, see the “Add or Set Up a Box data” section in the documentation.)
Please leave this option checked; if you uncheck it, it will replace the “z” in "cartonvector" with a “1”.
Rotator- Here you can apply an additional rotation when the item is on a cash register; this rotation is added to that of the shelves. (Only the Z-axis works perfectly; the Y-axis only works with the values "-90" and "90". The X-axis does not update the positions of the items on the checkout conveyor belt.)
(This allows for a rotation different from that of the shelves, which is useful, for example, for baguettes so they don't stand upright on the conveyor belt.)
Vector- Do this only after initializing the variables on the item's box. (For more information, see the “Add or Set Up a Box data” section in the documentation.)
Here, you can rotate each individual item in the boxes.
Note: If your items are standing upright and you want to lay them down, do not use the Y axis to rotate them; instead, apply a 90 rotation (important: not -90, but 90) on the X axis.
Vector- Do this only after initializing the variables on the item's box. (For more information, see the “Add or Set Up a Box data” section in the documentation.)
Here, you can add a translation for each item in the boxes that are being held, on the floor, or on pallets. There is no difference between this variable and “Offsetitem”
Vector- Do this only after initializing the variables on the item's box. (For more information, see the “Add or Set Up a Box data” section in the documentation.)
Here, we add space between the items in the boxes (boxes on the floor, held in hand, or on pallets)
Integer - Always leave it set to 0! it's used in the code and must never be changed.
Bolean - This variable is depreciate.
Vector - Do this only after initializing the variables on the item's box. (For more information, see the “Add or Set Up a Box data” section in the documentation.)
Here, you can add a translation for each item in the boxes that are being held, on the floor, or on pallets. There is no difference between this variable and “CartonOffsetPallet”
Float - This variable is depreciate.
Byte- Here you can enter 0 if customers do not need to use a scale after purchasing this item,
Bolean- Here, you must check the box if you want the item to appear in the game, or uncheck it if you don't want it to be included in the game.
Byte - This variable is depreciate.
Bolean - This variable is depreciate.
Integer - This variable is depreciate.